Friday, March 23, 2012

Monday, March 19, 2012

Friday, March 16, 2012
New Blog Template - Compliments of Leelou Blogs
Happy Friday friends - It has been a seriously rough few weeks but today I'm feeling happier, more settled and emotionally balanced. With the multiple life challenges coming my way in the very near future, I am blessed to have some very dear friends that have been a true blessing.
So....I have been searching the web the last few months looking for a new blog template that is more "Me" than "Not Me". Today I settled on a FREE template from LeeLou Blogs. I'm very happy with the template colors, the 3 columns and of course the flowers at the top of the header.
Let me know what you think........and enjoy your weekend. I'm outta here!!!!!!!!!!!
Hugs, Erin
Thank you girls........you know who you are. Love you!!!
So....I have been searching the web the last few months looking for a new blog template that is more "Me" than "Not Me". Today I settled on a FREE template from LeeLou Blogs. I'm very happy with the template colors, the 3 columns and of course the flowers at the top of the header.
Let me know what you think........and enjoy your weekend. I'm outta here!!!!!!!!!!!
Hugs, Erin
Thursday, March 15, 2012

Tuesday, March 13, 2012

Monday, March 12, 2012


Sunday, March 11, 2012

Wednesday, March 7, 2012

Tuesday, March 6, 2012
Sketchbook- do you tweet?
Just a cutesy-sketch inspired by a collage print I happened by in a quaint little gift shop a few months ago.

Happy Tuesday!
Hugs, Erin

Happy Tuesday!
Hugs, Erin
Wednesday, February 29, 2012

Tuesday, February 28, 2012
Be True to my Heart - Finished Canvas's
Here are photos of my creative process...Inspired by Donna Downey's Canvas Create series for February 2012.
The 3 photos below show:


I added Indian Yellow paint over the white ink to one word on each canvas. Then I added some blue liquid ink on an edge, turned the canvas so it would drip/run but I only ended up with a single line of ink. Then I remembered seeing a video about blowing air through a straw to move ink around so I tried that (only without the straw - didn't have one) and look what I got....a cool scattered paint blotch.
I am so happy with how these pieces turned out and am glad I did more than one so these can be sold as a set or separately. I am especially pleased with learning to use molding paste, gel medium, mixing color with gesso, fixing mistakes and how you can use masking tape and bubble wrap in the creative process.
So a big thanks to Ms. Donna Downey......she is a great teacher and inspiration.
Hugs to all, Erin
- addition of water-thinned Indian Yellow acrylic paint (on top of the original Magenta colored base) giving the background a funky orange with deep burnt orange undertones
- then Magenta acrylic paint was added to ridge around the heart and a water-thinned wash over the body of the heart
- then I made a circle template from a scrap piece of paper and painted the circle openings with Blue Green acrylic paint


The next two photos include:
- the addition of masking tape
- white acrylic paint rubbed over the raised textured areas on the background
- a word stamp with white ink pad
- a flower/heart/butterfly image stamped first with black ink, then a white ink pad


Hmmmm....dislike those circles and the color of the paint in those circles, blah
And......also dislike the image stamp, ugh
In the photo below, I painted over the parts I disliked with a Turquoise acrylic paint mixed with gesso.

I was happier with the Turquoise color but added more thinned white gesso to lighten up the color a bit (see below). I decided the masking tape looked too plain left untouched so that got a wash of Indian Yellow paint (below). That made the tape perfect! And I couldn't be finished there....
To add additional dimension I painted bubble wrap with black ink and pressed it down on a corner section. Then I stamped the bubble wrap with a white ink pad and added that to each canvas.


I am so happy with how these pieces turned out and am glad I did more than one so these can be sold as a set or separately. I am especially pleased with learning to use molding paste, gel medium, mixing color with gesso, fixing mistakes and how you can use masking tape and bubble wrap in the creative process.
So a big thanks to Ms. Donna Downey......she is a great teacher and inspiration.
Hugs to all, Erin
Friday, February 24, 2012
Be True to Your Heart - February Canvas Create, Step 2
The modeling paste dried well overnight so I added a base layer of water thinned acrylic paint.

Licensed to Drive
Happy Friday everyone - I can't explain how happy I am that it is finally Friday. Seriously......
The big news this week...........T2 (my 17 yo teen) got his drivers license on Tuesday (2/21/2012). Such a proud moment for him and I was equally proud of him. He has been a good and careful driver during his 6 months of permit driving with me in the passenger seat. I'm just hoping that he will remain a good and careful driver without me present to be the backseat driver.

The big news this week...........T2 (my 17 yo teen) got his drivers license on Tuesday (2/21/2012). Such a proud moment for him and I was equally proud of him. He has been a good and careful driver during his 6 months of permit driving with me in the passenger seat. I'm just hoping that he will remain a good and careful driver without me present to be the backseat driver.
Congratulations on Driver's License!
May traffic be light, your gas tank full, your lights be green, and your seat belt always buckled.
Drive safely (please)!

And I'll be picking up this vehicle for you this weekend!!
Yeah I love you but really that's not gonna happen
.......hahahaha (JK)!!!!
Hugs, Mom
Tuesday, February 21, 2012
Life Explained...
On the first day, God created the dog and said, "Sit all day by the door of your house and bark at anyone who comes in or walks past. For this, I will give you a life span of twenty years."

The dog said, "That's a long time to be barking. How about only ten years and I'll give you back the other ten?"


So God agreed......
On the second day, God created the monkey and said, "Entertain people, do tricks, and make them laugh. For this, I'll give you a twenty-year life span."

The monkey said, "Monkey tricks for twenty years? That's a pretty long time to perform. How about I give you back ten like the dog did?"
And God agreed......
On the third day, God created the cow and said, "You must go into the field with the farmer all day long and suffer under the sun, have calves and give milk to support the farmer's family. For this, I will give you a life span of sixty years."

The cow said, "That's kind of a tough life you want me to live for sixty years. How about twenty and I'll give back the other forty?"
And God agreed again......
On the fourth day, God created humans and said, "Eat, sleep, play, marry and enjoy your life. For this, I'll give you twenty years."

But the human said, "Only twenty years? Could you possibly give me my twenty, the forty the cow gave back, the ten the monkey gave back, and the ten the dog gave back; that makes eighty, okay?"
"Okay," said God. "You asked for it."
So that is why for our first twenty years, we eat, sleep, play and enjoy ourselves.

For the next forty years, we slave in the sun to support our family.

For the next ten years, we do monkey tricks to entertain the grandchildren.

And for the last ten years, we sit on the front porch and bark at everyone.

Life has now been explained to you.
There is no need to thank me for this valuable information.
I'm doing it as a public service and because I like You.
Happy Fat Tuesday! Hugs, Erin
Monday, February 20, 2012
Be True to Your Heart - February Canvas Create Series, Step 1
The new monthly online video class with Donna Downey arrived on 2/15 and I could hardly wait to watch the video. You can go to her link to find out more about the Donna Downey February Canvas Create Series. You can also see her final version of the February canvas. Her version is meant to inspire us and allow us to use different techniques. So I'm sure mine won't look like hers but I will utilize her techniques and take what I like from her video teaching.
This month includes use of modeling paste and other mixed media, both of which are new to me so I am super excited to try this out.
Below are three 8 x 8 gallery wrapped canvas, covered in wet modeling paste with patterned paper, hearts hand-cut by me and then pressed into the wet paste. I did these last night and the modeling paste needs to dry for 8-12 hours depending on humidity. So later this week (or maybe tomorrow) I will have more to show you as I work through each step in the process. I haven't done Mixed Media before so this will definitely be an adventure. Donna's version is awesome so we will see how mine turns out.
Hugs, Erin
This month includes use of modeling paste and other mixed media, both of which are new to me so I am super excited to try this out.
Below are three 8 x 8 gallery wrapped canvas, covered in wet modeling paste with patterned paper, hearts hand-cut by me and then pressed into the wet paste. I did these last night and the modeling paste needs to dry for 8-12 hours depending on humidity. So later this week (or maybe tomorrow) I will have more to show you as I work through each step in the process. I haven't done Mixed Media before so this will definitely be an adventure. Donna's version is awesome so we will see how mine turns out.
 |
| "Be True to your Heart" Series |
Friday, February 17, 2012
An Honest Bitch!
Just had to pass along this little statement, sent to me by a female friend. Some days and some weeks I know I'm a terror but hey, love me or don't....at least you know where you stand.
Love ya HS!!

Happy Friday!!!
Hugs, Erin
Love ya HS!!

Happy Friday!!!
Hugs, Erin
Thursday, February 16, 2012
Art Journal Page - Love
I have been researching Art Journals lately and have found tons of inspiration on Pinterest, YouTube and art blogs. So I purchased a journal and some new markers (love them) and got to work.
This is my first art journal page.....fun and funky, in honor of Valentines Day this week. The page started with watercolor crayons and then I added additional color with the new markers. The created the swirls and squiggles with a black paint marker and then added the white paint marker.
 |
| First Art Journal Page - "Love" |
It is such a happy feeling to create, even if it isn't something that you would sell or hang in your house. Just to have fun playing with paint, markers, etc. It's like being a kid again. Give yourself permission to draw, color or paint.
It is good for your soul!!
Hugs, Erin
Wednesday, February 15, 2012
My first watercolor painting-Tulips
Happy Wednesday morning my friends - I have been busy experimenting with watercolor paper and watercolor crayons. This is my first water color painting. I obviously have a lot to learn but not a horrible piece for my very first time. Plus it gives us thoughts of spring and flowers (one of my favorite things).
I hope you have a lovely day.
Hugs, Erin
 |
| "Tulips" - created on 140 lb watercolor paper with watercolor crayons |
Hugs, Erin
Tuesday, February 7, 2012
New Painting Inspired by Donna Downey - Canvas Create series
Do you love to scrapbook, papercraft, sketch, paint, create stuff (of any kind) with your hands? Well that's me in a nutshell. I am happiest when I can create something.
So, for anyone that is involved in the scrapbooking or paper crafting world, you probably know the name Donna Downey (she's very talented in everything she creates!!). She has been an inspiration for my scrapbook/paper crafting, for a few years now. Last month I happened to wonder across her blog Simply Me and she is offering online classes (how did I miss out on her online classes?!). One of her new ventures is the 2012 Canvas Create series. Video instructions with Donna creating a new Canvas each month with her awesome advice and inspiration.
 |
| Image taken from Donna Downey site (link provided above) |
I signed up for a full year of canvas painting classes at 2012 Canvas Create Series. You can find tons of inspiration on her blog as she regularly posts videos of her Art Journal creations. So now I also have a keen interest in Art Journals so I will be sharing my creations with you soon.
Below is my version of the January canvas, inspired by Donna Downey's class. The flower didn't turn out quite the way I wanted but you live and learn. I was pretty pleased with how the background looks and my ability to freehand the word "inspire". I learned a lot about gesso (my new favorite product for painting), in addition to mixing paint colors so they don't end up muddy (really ugly) colored. Her video instruction was truly awesome. Being a tad OCD and perfectionistic, I reckon I will re-paint the flower this weekend and post the update. Why you ask? Well because I learned that you can put gesso over what you painted, let it dry and start over. Holy cow....how cool it that!! See me....I'm doing my happy, happy dance!! (which my two teenage boys think is completely uncool! --- Ha, what do they know!?)
 |
| New painting on a 14x16 gallery wrapped canvas |
Erin
Tuesday, January 31, 2012
Blog Comment Help...You Should Read this (and then comment)
I love to receive comments, we all do. Right?! They bring a smile to my face and put a bounce in my step.
And Hello, who doesn't love some positive feedback or blogger friend support on a bad day. I want to respond to your comment with something, like..."Love your comment", "Amen to that","Thanks for stopping by", etc., etc., etc. Really I do!!
But, if your email address isn't linked to your Google Profile or you don't leave your email address in the post I can't respond!
The following information is copied directly from a new blog I have been following...Tiffany, over at The Nest Effect. She has free printables, organizing tips/projects and overall good stuff to share. I've spent a few minutes (hours really) reading through her blog and there is lots of good stuff over there to help with home management and life. So check her out @ http://www.thenesteffect.com/
Note: The following is taken directly from blog (with her permission) to share with my followers. http://www.thenesteffect.com/2012/01/attention-blog-post-commenters-this.html
Double Note: My email settings were not correct before I read her post but as of today...I'm updated correctly. Woot! Woot! Thanks for sharing Tiffany!!
-----------------------------------------------------------------------------
Attention Blog Post Commenters: This Post Is For You!
Love, love, love when I receive comments. They make my day. Honest.
Many comments that are left are questions or statements that deserve some followup. But, if your email address isn't linked to your Google Profile or you don't leave your email address in the post, I can't respond!
Unless it's a giveaway post and I'm receiving comments for entries, I really try to respond to every single comment that I'm left. Even if it's just one that says that you love my blog. Hello! I love your positive feedback. I want to email you back and THANK YOU!
A few months ago Shelley, from The House of Smiths, wrote a blog post on this topic. Now I know why. I'm going to show you how to change this setting.
This is what I get when I try to reply to a comment without a linked email address: noreply-comment@blogger.com. Boo!

If you comment with your Google account, then it will make you "sign up for Blogger" before leaving your first comment. This doesn't mean you have to create a blog or anything, it just means you have to create a profile with Blogger so you can comment with your Google account. You can change all of the profile details to make it as anonymous as you'd like once you create the profile.


Then you'll need to click "show my email address" and "save profile". You can change the email address that is associated with this feature on this page as well - under "identity" and "email address". You can always use your "junk mail" account or set up an email with Gmail for this.

Your email address will not literally show up in your Blogger profile. It will show like this:

When you leave a comment for me, I receive an email with your comment, and your email address will automatically be the "reply to" email (if you go through these steps and enable this feature). Pretty simple.
All in all, I'd really like to be able to respond to each one of you. You can always leave your email address in the comment for me like this: tiffany (at) thenesteffect.com. That way it can't be picked up by spam bots because it's not technically a real email typed like that.
Thank you! =]
* You may repost this, as long as you link back to my blog. Thanks! *
---------------------------------------------------------------
So dear ladies and gentlemen, there is my tip for this lovely Tuesday! It is unseasonably warm 50-60 degrees here is Iowa. (A very rare occurrence but I'll take it!!). Hope you are enjoying your week.
Hugs, Erin
Thursday, January 26, 2012
New Pencil Sketch
Happy Thursday my friends - Super busy at work this week but have enjoyed sketching in the evenings to relax my brain. I think this is the first sketch I've shared here so I will need to take some photos so you can see my other doodles.
 |
| Pencil Sketch by Erin |
I hope everyone is having a fabulous week. I am certainly looking forward to the weekend.
Hugs, Erin
Sunday, January 22, 2012
Homemade Cleaning Product - Oxy Clean
Happy Saturday Blogger Friends - Here is yet another homemade cleaning product that you can make very cheaply. I found this via Pinterest (I know you are shocked...haha) and you will definitely want to check out the full post at http://www.creativelydomestic.com/2009/06/homemade-oxyclean.html. Creatively domestic provides us with the actual process to soak for stained items with nice photos.
Homemade OxyClean Ingredients
Homemade OxyClean Ingredients
- 1 cup water
- 1/2 cup hydrogen peroxide
- 1/2 cup baking soda
Mix together and soak laundry in it for 20 minutes to overnight and then wash as usual. Or you can just skip the water and pour the peroxide and baking soda directly into the wash with your laundry soap and wash as usual.
 |
| Here's what you need and my glass jar with a lid (a spagetti sauce jar) |
Enjoy the blessing of this day!
Hugs, Erin
Hugs, Erin
Wednesday, January 18, 2012
Homemade Cleaning Product - Spot Remover
Happy Friday (or really TGIF!!!) - I had pre-scheduled this to post on Wednesday, 1/18/12 at 7 am but just noticed today that it was still sitting in my "Draft" posts (along with my pre-scheduled Thursday post...boo hoo).
WTH- Is anyone else having trouble with scheduling posts a few days out? It definitely didn't work for me. So you will see my original post below which is now updated with my resulting photos from using this Spot Remover and the result photos. This stuff is GREAT! Try it out!
Hugs, Me
=======================
Wednesday Blogger Friends - I found this fabulous homemade spot remover recipe on Pinterest at "One Good Thing by Jillee blog" http://www.onegoodthingbyjillee.com/2011/11/goodbye-to-yellow-armpit-stains.html
This is super easy to make.
You will need:
Then, pour the mixture directly on the stain and watch it disappear. I have testedI will be testing this out tonight on a nasty pillowcase stain (it is my son's pillowcase so only God knows what the stain is...and I'm not asking. haha)
I am telling you, this is awesome stuff (and cheap) so I will be spending the weekend seeing what else I can remove stains from. Holy cow........I was planning to toss the pillowcase but sure am glad it worked.
Enjoy the blessing of this day!
Hugs, Erin
WTH- Is anyone else having trouble with scheduling posts a few days out? It definitely didn't work for me. So you will see my original post below which is now updated with my resulting photos from using this Spot Remover and the result photos. This stuff is GREAT! Try it out!
Hugs, Me
=======================
Wednesday Blogger Friends - I found this fabulous homemade spot remover recipe on Pinterest at "One Good Thing by Jillee blog" http://www.onegoodthingbyjillee.com/2011/11/goodbye-to-yellow-armpit-stains.html
This is super easy to make.
You will need:
- one part Dawn dishwashing liquid (1/2 cup)
- two parts HYDROGEN PEROXIDE (2 cups)'
- container with lid
Then, pour the mixture directly on the stain and watch it disappear. I have tested
 |
| Items you need: hydrogen peroxide, blue (Dawn) dishwashing detergent, empty container with lid |
 |
| This is my son's (T1) super dirty, super nasty pillowcase.......yuk!! |
 |
| I poured in enough hot water to cover the pillowcase, dumped in about 1/2 cup of the spot cleaner and then swished it around a bit. I let this soak overnight in my bucket and then tossed in the washer with a small amount of regular detergent in the morning. |
 |
| This is the amazing result from soaking overnight. Every stain is gone!! Beautiful!! (please note this was never a white case but the dirty yellow-sweaty color is now gone...the photo doesn't show that difference) |
Enjoy the blessing of this day!
Hugs, Erin
Tuesday, January 17, 2012
Homemade Cleaning Products - Fabric Softner
Happy Tuesday Blogger Friends - Being a tad bit OCD I tend to cycle through different interests very quickly, some interests stick and some come/go quickly. Over the last 2 months I have been on a sewing frenzy for small and easy projects, due entirely to my Pinterest obsession. In my opinion, Pinterest this is the best thing since indoor plumbing and central air conditioning (I like my modern stuff...haha). To me, Pinterest is photos, links and lots of great information that I can keep organized on-line however it works for me. Here the link to the Pinterest main page so you can read about it, if you are so inclined. http://pinterest.com/about/
My latest frenzy has been on the Pinterest postings for homemade cleaning products. I found this via The Frugal Girls blog. They have an excellent blog with lots of homemade cleaning recipes. Check them out: http://thefrugalgirls.com/homemade-cleaners
What You’ll Need:
Enjoy the blessing of this Tuesday!
Hugs, Erin
My latest frenzy has been on the Pinterest postings for homemade cleaning products. I found this via The Frugal Girls blog. They have an excellent blog with lots of homemade cleaning recipes. Check them out: http://thefrugalgirls.com/homemade-cleaners
What You’ll Need:
- 6 cups HOT water
- 3 cups white vinegar
- 2 cups Suave Refreshing Waterfall Conditioner (I used "Ocean Breeze" but chose your favorite)
- Mix conditioner & hot water well, until conditioner is dissolved completely.
- Add the vinegar, and mix well.
- Store in a large container (empty fabric softener container, empty large vinegar bottle, etc.; I used a large plastic cereal type container with a pourable lid)
- Pour into a downy ball (I don't have one of these cool things)… or use approx. 2 tbsp. in the fabric softener spot in your laundry machine… then wash!
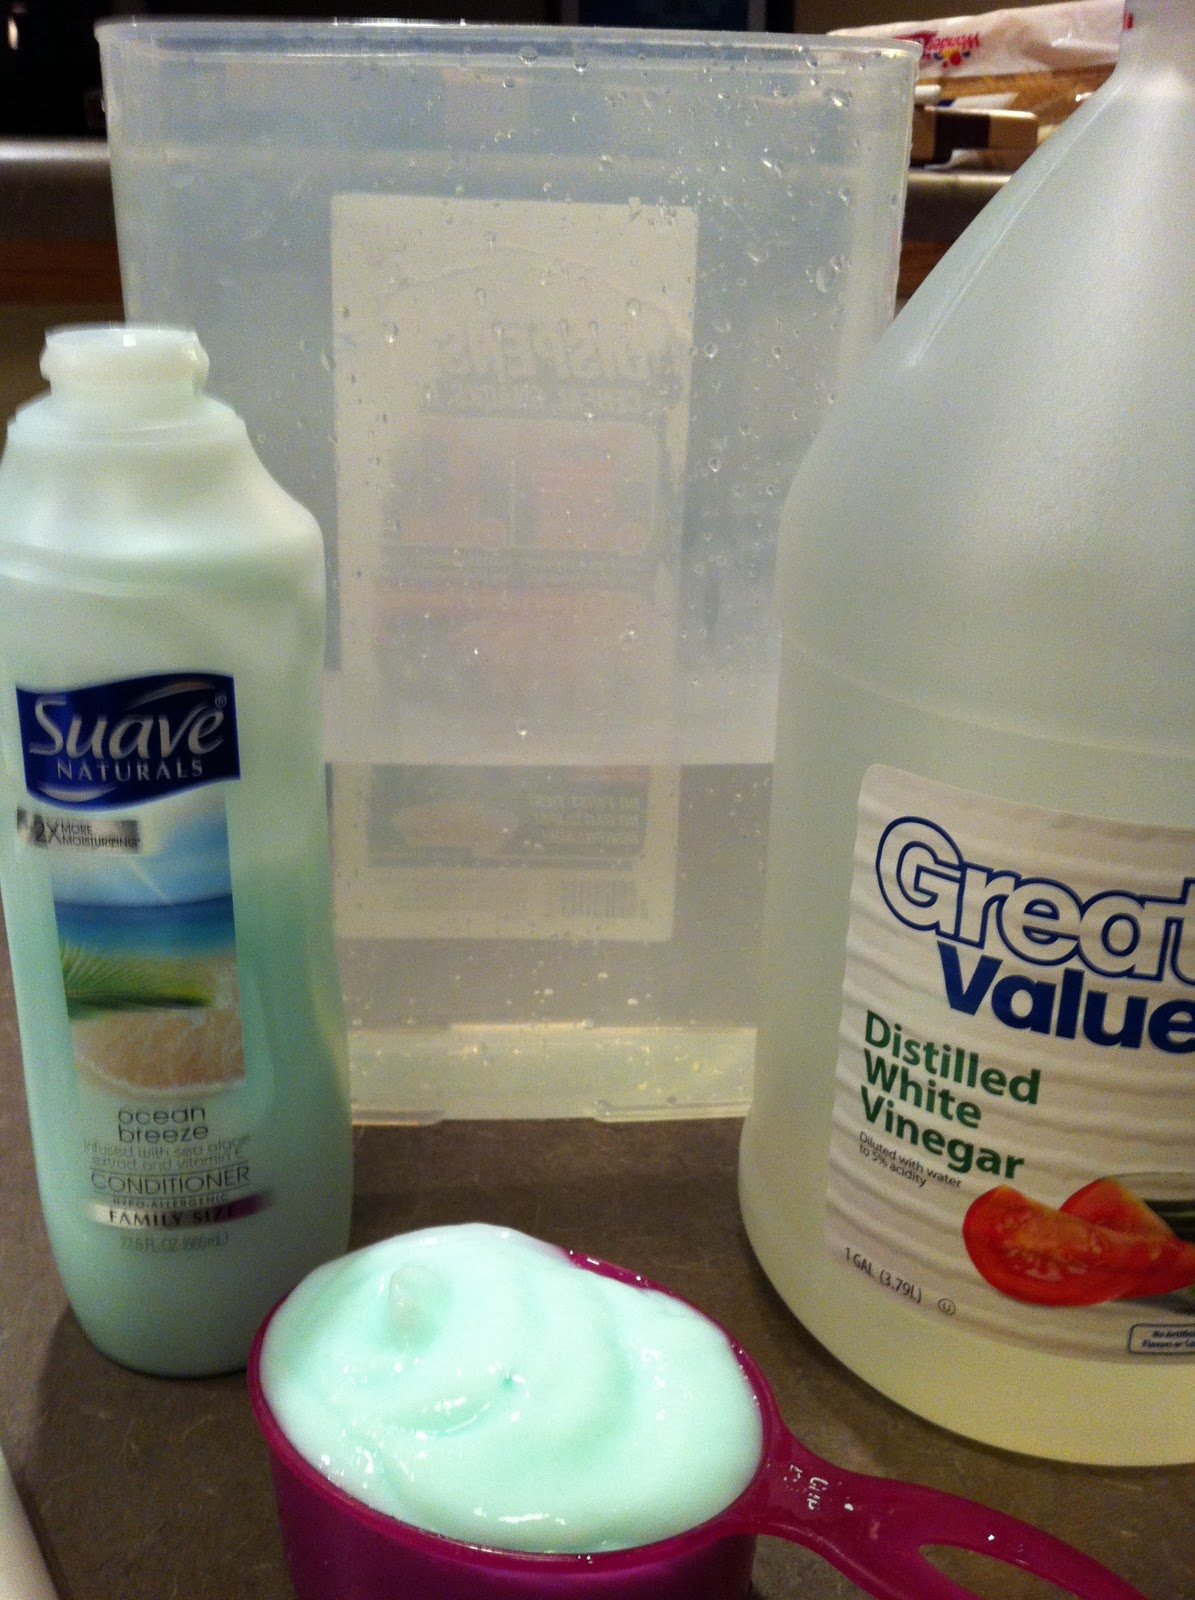 |
| Items you need: hot water, conditioner, vinegar, pourable container, measuring cup |
 |
| Hot water with conditioner added, stir until dissolved |
 |
| Finished product with my ugly handmade sign (I'll type up a pretty recipe for my next post) |
Enjoy the blessing of this Tuesday!
Hugs, Erin
Wednesday, January 11, 2012
Happy 2012 my Blogger Friends
Fabulous people - I am surprised that I still have 21 followers since it has been a full year (this month) since my last blog post.
What can I say, life got away from me and family time became a priority. But I am pleased to report that I currently have some available time and would like to begin writing and sharing with you again.
My plan is to create posts at least weekly but am not ready to commit to a specific day yet.
I hope everyone had a wonderful 2011 and I look forward to what 2012 will bring us.
 |
| "Sunflower" acrylic paint on an 8 x 8 wrapped canvas This is my newest piece of art, created in the Fall of 2011. |
Happy Wednesday!
Hugs, Erin
Subscribe to:
Posts (Atom)